Workshops jekyll theme
Jekyll is a static site engine integrated into Github pages. In particular, it enables markdown files to be generated and formatted in HTML. This theme, in the Wild colors, is a suggested layout for the markdown format teaching aids used during training sessions.
How it works
Create your content (workshop, support, dojo, etc.) on a Git repository as you probably already do.
Write your instructions in the README.md file, using the hierarchy of <h1>, <h2>, <h3>,… headings to
structure your document.
Publish on Github pages using this theme from the Wild Code School graphic charter.
Installation
Installation is performed using a _config.yml file, to be placed at the root of your folder, in which you simply enter
the code below:
remote_theme: WildCodeSchool/workshops-jekyll-theme
And that’s it! The workshops-jekyll-theme is now defined for use when you publish your project via Github pages (see
the deploy section).
You can also download this _config.yml file, already set up with the configuration variables described below.
Configuration
Below is a list of variables that can be added to the _config.yml file if you wish to customize the display.
| Variable | Type | Default | Description |
|---|---|---|---|
| style | string | dev | Indicate the dominant color of the page. Possible values: dev, data, ciber, design and wild. The themes use the colors associated with each curriculum. |
| title | string | none | Title displayed in the <header> section of the page. |
| description | string | none | Text displayed under the <header> section title |
| type | string | Workshop | Short text displayed under the <header> section (logo line). |
| main_image | string | none | Cover image displayed before the main content (indicate an http address or the relative path of a file from the root of your folder). |
| show_clone | bool | false | Show/hide pre-populated git clone <address-of-your-repository> command. |
| show_toc | bool | true | Show/hide table of contents. |
| lang | string | en | Set HTML lang attribute |
Note that each variable may be rewritten in the yaml front matter of a page.
---
title: A special title
description: A special description
---
Example
remote_theme: WildCodeSchool/workshops-jekyll-theme

style: data
title: Basic workshop
description: Default tempate with cover image
type: Data theme
main_image: https://cdn.pixabay.com/photo/2020/08/09/14/25/business-5475661_1280.jpg
show_clone: true
See the rendering of this configuration.
Templates
Two templates are available.
- default (selected by default): Sections are automatically generated from
<h1>and<h2>headers. - tic-tac: For paired workshops. Sections generated from
<h1>headers occupy a full width. Sections generated from<h2>headers are positioned on a two-column grid, alternating right/left.
Select
Template selection is also made via the _config.yml file using the layout key in the defaults table, indicating the template name as follows:
defaults:
  - scope:
      path: "" # an empty string here means all files in the project, if any
    values:
      layout: tic-tac # the tic-tac template will be used
Styles
A few explanations about the formatting applied to certain HTML elements.
The theme formats all basic HTML elements that can be generated in markdown.
Since Jekyll relies on the kramdown library to convert
markdown files into HTML, it is possible to call up CSS classes at the time of input, thanks to the
syntax {: .class-name-css }. This code should be placed on the line adjoining the line(s) to be formatted. This is the case for
the Alert info and Alert warning blocks shown below.
Alert info
Use kramdown syntax {: .alert-info }
Some text
{: .alert-info }
Will create a paragraphe with CSS class alert-info
⬇
Some text
Alert warning
Some text…
Some text…
{: .alert-warning }
Will create a paragraphe with CSS class alert-warning
⬇
Some text…
Some text…
Blockquotes
> Further details [with links](#), `inline code` or block of code
> ```php
> $content = 'block of code'
> ```
Creates a multi-line <blockquote>
⬇
Further details with links,
inline codeor block of code$content = 'block of code'
Images
Images retain an inline display type.


⬇
The CSS properties max-width: 100% and height: auto; are applied to them to be responsive.

⬇
Text align
Two css classes are available to modify text alignment.
{: .text-center }: center alignment{: .text-end }: right alignment
Useful for modifying image alignment, for example.

{: .text-center }
⬇
Markdown in HTML tags
By default, when using HTML tags in a page like this:
<div>

Hello World !!!

</div>
The content Hello World !!! is parsed as HTML code for many HTML tags. This means you won’t be able to use markdown inside these HTML tags.
You can explicitly activate markdown parsing with markdown="1":
<details markdown="1">
<summary>
A solution ?
</summary>

```js
// without markdown="1", this will be parsed as regular HTML text

console.log("Hello World !!!");
```

</details>
Table of content
For the two templates currently available (default and tic-tac), the table of content is generated from
headings <h1>, <h2>, <h3>, and <h4> as long as the semantic hierarchy is respected (don’t go directly from a <h2> to a <h4>, for example).
The content table can be disabled (see Configuration). In all cases, it is not displayed in mobile view.
Deploy
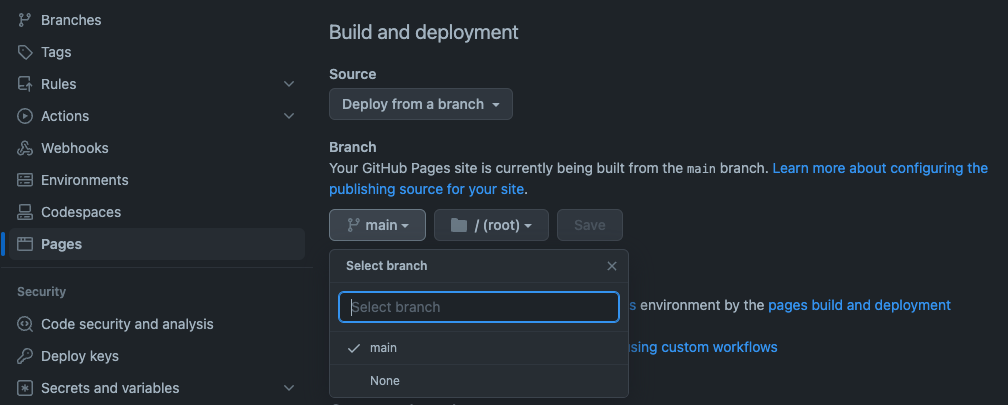
Deployment on Github Pages is done via the Settings > Pages tab of a Github repository.
Select the reference branch (usually main) and click on Save.

The page will be accessible a few moments later at https://<account_name>.github.io/<repository_name>.
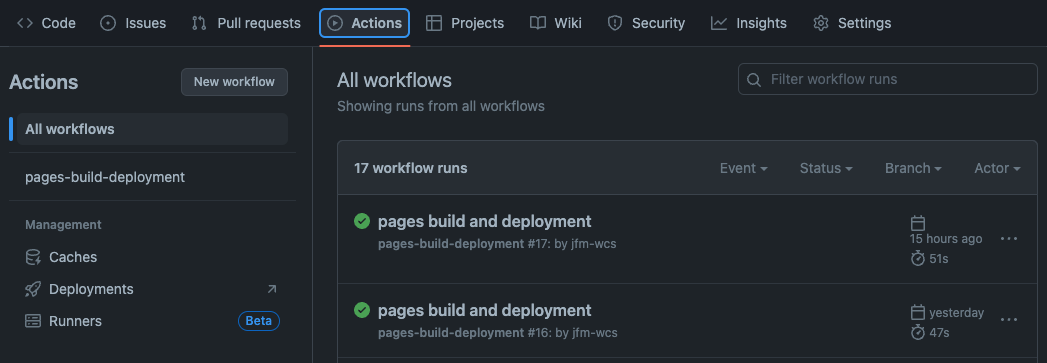
Each update to the main branch will automatically trigger a new deployment to be followed via the Action tab.
 More information on Github pages.
Test locally
To test locally your contents before deploy, you must install Jekyll on your laptop.
When it’s done, add this Gemfile file at the root of your foler and run the following command:
bundle install
Finally, launch Jekyll with the command :
bundle exec jekyll serve --livereload
And browse http://localhost:4000.
Jekyll generates the files (HTML, CSS, JS, etc.) in the _site folder, just as Github Pages will do on deployment.
Remember to add this folder to your .gitignore file so as not to include them in your version history.
# .gitignore
_site
Demo
Various configuration examples and styles with fake content.
- Basic workshop (with clone button / Dev)
- Basic workshop (with cover image / Data)
- Chip and Dale workshop (no table of content / Ciber)
- Chip and Dale workshop (with table of content / Design)